分析盘古的代码保护
盘古是国内的越狱先驱,首次发布 iOS 9 的越狱工具。最近遇到一个问题,修改 SystemVersion.plist 文件,将版本号改成 10.3.3 会遇到不能越狱的情况,由于 9.3.1 不是完美越狱,重启之后需要再次越狱,这时问题来了,重启前修改了版本号,再次运行盘古时会提示版本号不支持,导致不能越狱,如下图所示:

网上搜索相关方法,找到这篇文章 手残改掉SystemVersion.plist导致无法越狱修复办法, 这篇文章的原理是对系统版本号获取的函数进行 Hook,修改成真实的版本,看起来是靠谱的,但实际操作并不顺利,因为盘古是有代码保护的,如果注入动态库会闪退,下面我们来分析一下盘古用了哪些代码保护的方法,只要把这些方法绕过,就能注入代码进行 hook,解决提示版本号不支持的问题。
尝试使用 MonkeyDev 运行盘古,运行之后程序自动退出,在 main 函数中有三处是用于防护的代码,分别是 sub_10000EE30、 sub_10000EE80、 sub_10000EE80,下图中已经标识清楚。

sub_10000EE30 这个函数调用 ptrace 防止调试器挂载。
|
1 2 3 4 5 6 7 8 9 10 11 12 13 |
__int64 sub_10000EE30() { void *v0; // x0 void *v1; // x19 void *v2; // x0 v0 = dlopen(0LL, 10); v1 = v0; v2 = dlsym(v0, "ptrace"); ((void (__fastcall *)(signed __int64, _QWORD, _QWORD, _QWORD))v2)(31LL, 0LL, 0LL, 0LL); return dlclose(v1); } |
然后在 sub_10000EE80 这个函数中调用了 sysctl 检测到有调试则调用 exit 函数退出程序。
|
1 2 3 4 5 6 7 8 9 10 11 12 13 14 |
__int64 sub_10000EE80() { ...... result = sysctl(v5, 4u, &v3, &v2, 0LL, 0LL); if ( (_DWORD)result == -1 ) { perror("sysctl"); exit(-1); } if ( v0 == v8 ) result = (v4 >> 11) & 1; return result; } |
MonkeyDev 默认有一个 AntiAntiDebug.m 文件,里面有绕过反调试的实例,稍加修改就可以绕过。绕过反调试之后运行盘古还是会闪退,即使不在调试器运行,也会闪退,于是尝试将 MonkeyDev 的配置 MONKEYDEV_INSERT_DYLIB 修改成 NO,代表不注入动态库,如下图所示:

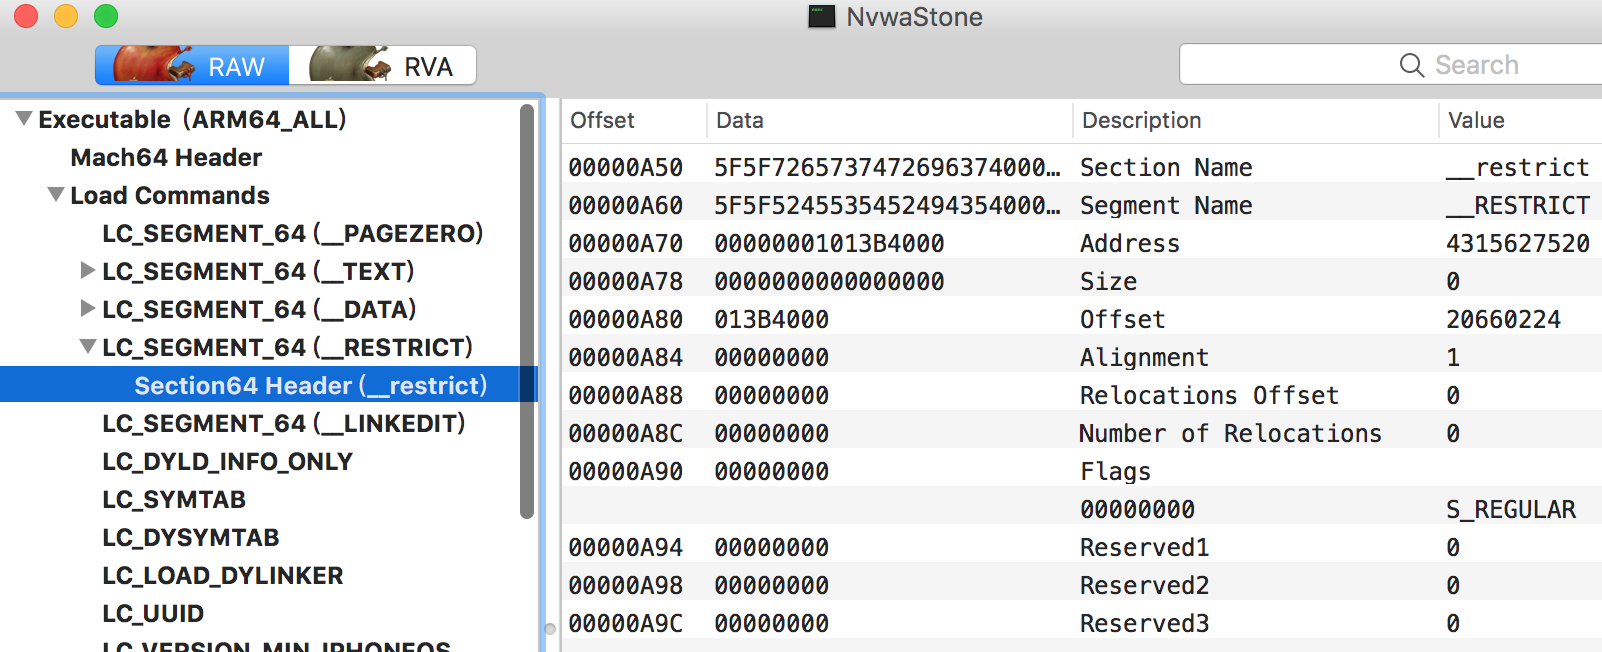
此时在手机上点击盘古运行不会闪退,说明如果不注入是正常的,接着 MONKEYDEV_INSERT_DYLIB 改回 YES,然后在 iOS 10.3.3 设备上运行,是不闪退的,这时想到会不会是文件中插入了 RESTRICT 段来限制加载动态库,这种防护方法在 iOS 9 是有效的,但是 iOS 10 及以上是无效的,使用 MachOView 打开盘古的可执行文件(NvwaStone),发现 RESTRICT 段确实是存在,如下图所示:

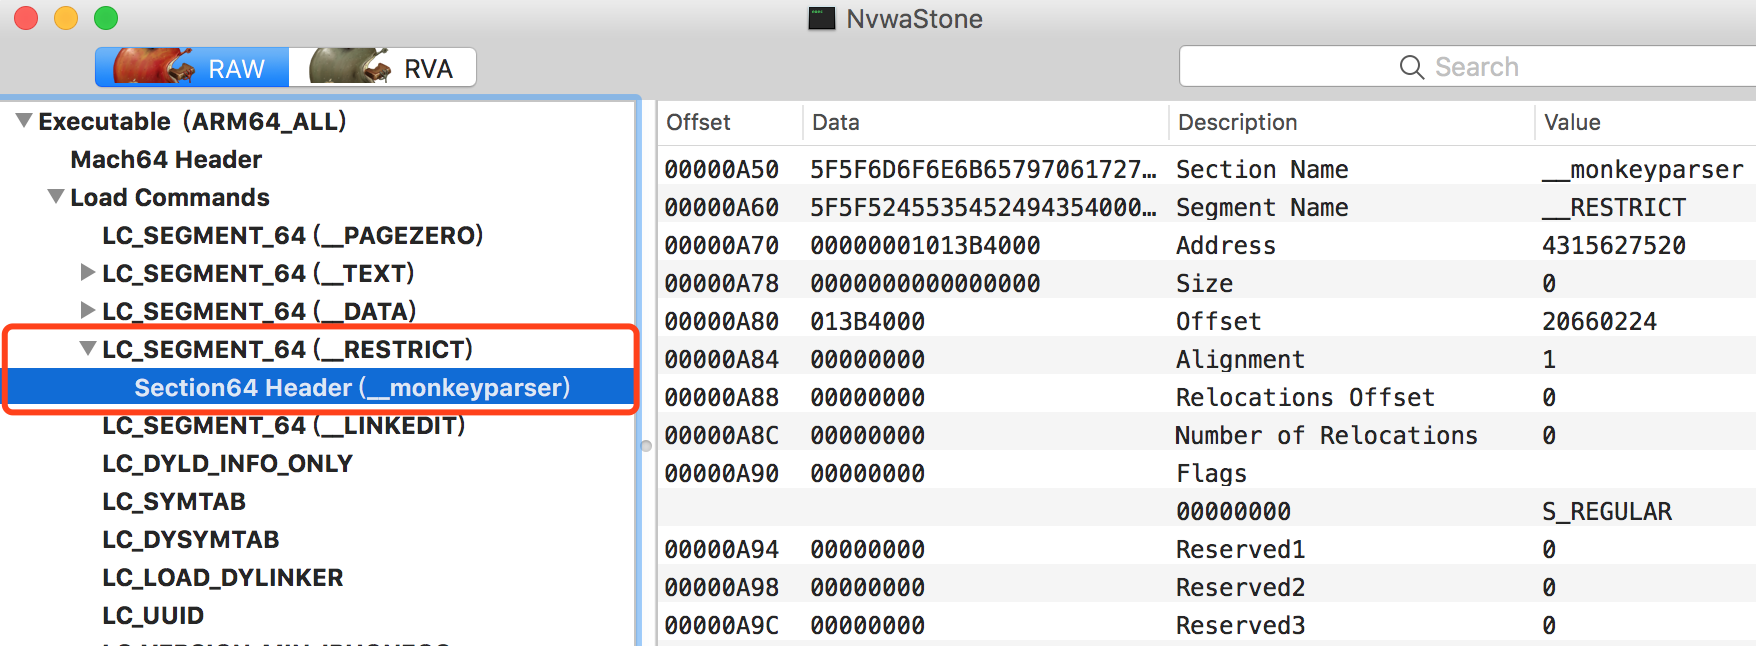
但是 MonkeyDev 已经帮我们处理了,修改成 monkeyparser,按理说已经绕过了这种防护方法,为什么还是不行呢?如下图所示:

MonkeyDev 处理 RESTRICT 段的过程可以在 /opt/MonkeyDev/Tools/pack.sh 脚本里看到,调用的是 monkeyparser 这个程序完成的注入和处理 RESTRICT 段,核心代码如下:
|
1 2 3 4 5 6 7 8 9 10 11 12 13 14 |
MONKEYDEV_PATH="/opt/MonkeyDev" # monkeyparser MONKEYPARSER="${MONKEYDEV_PATH}/bin/monkeyparser" ...... # Inject the Dynamic Lib APP_BINARY=`plutil -convert xml1 -o - ${BUILD_APP_PATH}/Info.plist | grep -A1 Exec | tail -n1 | cut -f2 -d\> | cut -f1 -d\<` if [[ ${MONKEYDEV_INSERT_DYLIB} == "YES" ]];then "$MONKEYPARSER" install -c load -p "@executable_path/Frameworks/lib""${TARGET_NAME}""Dylib.dylib" -t "${BUILD_APP_PATH}/${APP_BINARY}" "$MONKEYPARSER" unrestrict -t "${BUILD_APP_PATH}/${APP_BINARY}" chmod +x "${BUILD_APP_PATH}/${APP_BINARY}" fi |
继续再分析发现在 main 函数里的 sub_10000EE80 调用了 open 会打开自动文件,然后调用 mmap 将文件数据映射到内存,判断字符串 __RESTRICT 和 __restrict ,如果数据被修改则返回 0xFFFFFFFFLL。对于这种情况我们怎么绕过呢?我想的一个方法是将原始的可执行文件 NvwaStone 复制一份,比如名称是 NvwaStoneX,然后 hook open,判断 path 参数如果是自身文件路径则修改成 NvwaStoneX 的路径,代码如下:
|
1 2 3 4 5 6 7 8 9 10 11 12 13 14 15 16 17 18 19 |
int my_open(const char *path, int oflag, ...) { va_list ap = {0}; mode_t mode = 0; char *new_path = malloc(100); if (strstr(path, "NvwaStone")) { printf("Calling real open('%s', %d)\n", path, oflag); strcpy(new_path, path); strcat(new_path, "X"); printf("New path: %s", new_path); return orig_open(new_path, oflag, mode); } free(new_path); return orig_open(path, oflag, mode); } rebind_symbols((struct rebinding[1]){{"open", my_open, (void *)&orig_open}}, 1); |
由于原始的 NvwaStoneX 文件未被做任何修改,所以能够绕过文件的校验。此时我们可以愉快地注入动态库,对相应的方法进行 Hook,修改成真实的版本号,盘古越狱的流程正常。最后附上修改版本号 Hook 的代码。
|
1 2 3 4 5 6 7 8 9 10 11 12 13 14 15 16 17 18 19 20 21 22 23 24 25 26 27 28 29 30 31 32 33 34 35 36 37 38 39 40 41 42 43 44 45 46 47 48 49 50 51 52 53 54 55 56 57 58 59 |
/*======= patch systemVersion with method swizzling =======*/ #import <CaptainHook/CaptainHook.h> CHDeclareClass(UIDevice); CHDeclareClass(NSString); // template CHConstructor { CHLoadLateClass(NSString); } CHMethod(0, NSString *, UIDevice, systemVersion) { // NSString *realSystemVersion = CHSuper(0, UIDevice, systemVersion); NSString *fakeSystemVersion=@"9.3.3"; return fakeSystemVersion; } __attribute__((constructor)) static void EntryCaptainHook() { NSLog(@"hello patch!"); CHLoadLateClass(UIDevice); CHClassHook(0, UIDevice, systemVersion); } /*======= patch systemVersion with fishhook(GOT table hook) =======*/ #include <fishhook/fishhook.h> #include <CoreFoundation/CoreFoundation.h> #include <dlfcn.h> #include <mach-o/dyld.h> CF_EXPORT CFDictionaryRef _CFCopySystemVersionDictionary(void); CFDictionaryRef (*orig_CFCopySystemVersionDictionary)(void); #define CONST_STRING_DECL(S, V) const CFStringRef S = (const CFStringRef)__builtin___CFStringMakeConstantString(V); CONST_STRING_DECL(_kCFSystemVersionBuildVersionKey, "ProductBuildVersion") CONST_STRING_DECL(_FakeProductBuildVersion, "13G34") CONST_STRING_DECL(_kCFSystemVersionProductVersionKey, "ProductVersion") CONST_STRING_DECL(_FakeProductVersion, "9.3.3") CFDictionaryRef fake_CFCopySystemVersionDictionary(void) { CFDictionaryRef tmp_dict = orig_CFCopySystemVersionDictionary(); CFDictionarySetValue((CFMutableDictionaryRef)tmp_dict, _kCFSystemVersionBuildVersionKey, _FakeProductBuildVersion); CFDictionarySetValue((CFMutableDictionaryRef)tmp_dict, _kCFSystemVersionProductVersionKey, _FakeProductVersion); return tmp_dict; } __attribute__((constructor)) static void EntryFishHook() { intptr_t (*pub_dyld_get_image_slide)(const struct mach_header *mh); pub_dyld_get_image_slide = dlsym((void *)dlopen(0, RTLD_LAZY), "_dyld_get_image_slide"); const struct mach_header *header = _dyld_get_image_header(0); intptr_t slide = pub_dyld_get_image_slide(header); rebind_symbols_image((void *)header, slide, (struct rebinding[1]){{"_CFCopySystemVersionDictionary", fake_CFCopySystemVersionDictionary, (void *)&orig_CFCopySystemVersionDictionary}}, 1); } |
转载请注明:exchen's blog » [iOS Hacker] 分析盘古的代码保护